

The Sides
In part one we built the base of the basket.
Now that is completed we are moving onto the walls of your basket.
You will need:
- 15 lengths of bramble, that are strong but still have a level of flexibility – for the uprights.
- Lots of flexible bramble lengths for the weaving, I tend to go thinner than the base of the upright stakes, for aesthetics.
- Thick gloves
- Sharp Knife
- Secateurs
- A strong stick sharpened to a point or wedge is very useful too, or a bodkin if you happen to have one of those…

Basket Weaving Course
Create your very own willow basket. We take you through the entire basket weaving process from how to harvest your willow to how to care for your basket.
All of our courses are available as 24month gift vouchers which can be purchased here.
Timings: 9.30-5pm
A…
Time needed: 1 hour and 30 minutes
Making the sides of the basket
- The upright parts of a basket are called the stakes, we are going to place these in now.
Get the 15 lengths of thicker brambles, you’ll still need the tops to be flexible as you’ll be weaving your border with these later.
If you’ve made the basket larger or have very flexible weaving brambles you can increase the number of stakes, keep it an odd number though. This will make your basket more rigid as it dries. But I found that 15 works well, and my baskets were still rigid after they dried.
- Look at your stakes. Do they have a natural curve?
If they are curving (in a vertical plane) you want to work with this natural curve.
- Cut the butt end of the stakes into a long point
With the point on the outside side of the curve if it exists.
- Slide the stakes in beside the rods on the base, your wedge stick will be very helpful here.
Try to get them in as far as possible. If your spokes aren’t perfectly even you can place your stake to the left or right of the rod to help even the stakes out.
- You will now have a giant 15 legged bramble spider on the floor!
Don‘t worry it’ll soon look more like a basket.
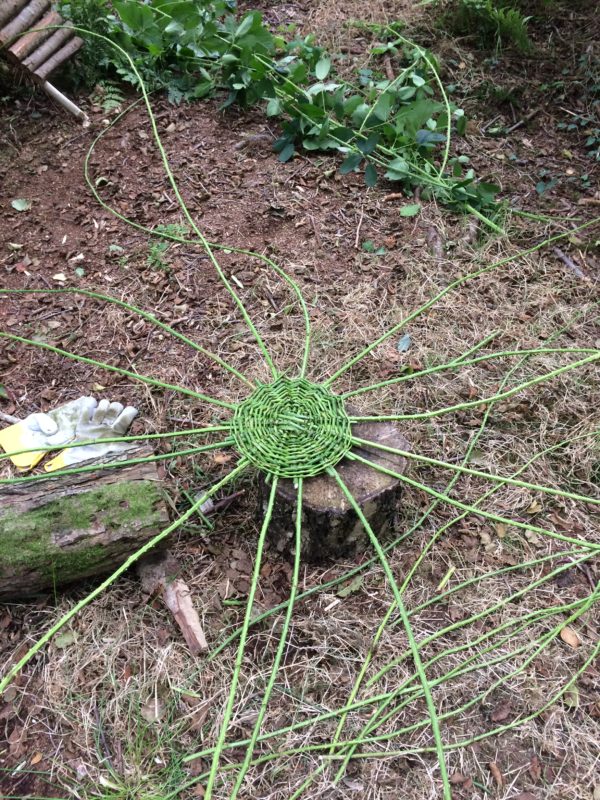
- We now start to bend up the stakes,
using your thumb nail about 1/2cm away from the edge of the base weave, kink each rod individually and allow it to fall back to rest.
- Once they are all done gather them together and tie them off high up with a bit of string or a loop of brambles,
ensuring the lower section of your stakes are straight and not tapering in.
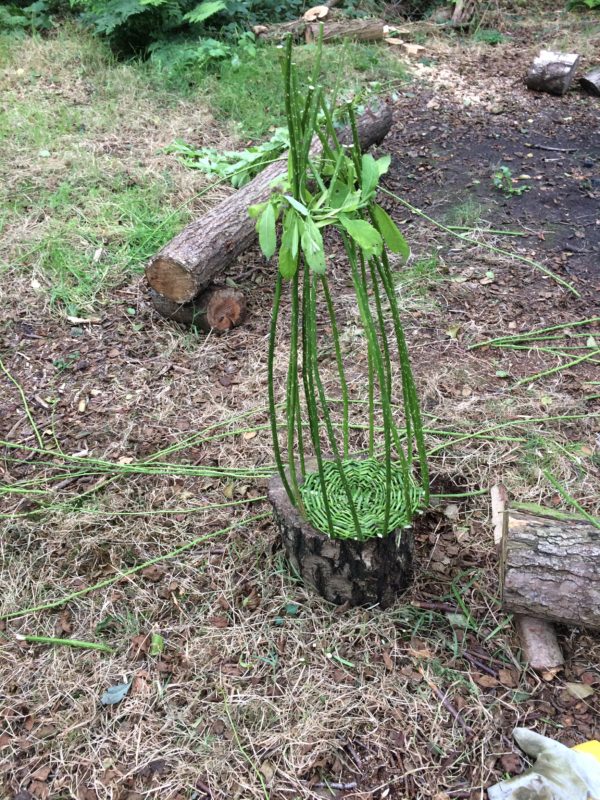
- Cut off the end of the spokes,
making sure they are cut back behind the stakes.
- Now to start securing the stakes in place.
This process is called the upset and the weave we will use is wailing.
- You’ll need three similar flexible rods for this, preferably without too much differential in width, cut to the same length.
This part is easiest done with the basket in your lap (I hope you did a good job dethorning it!).
- Starting with the tips, tuck them about 5cm into the base on the left of three stakes.
Hold them in tight to start, they’ll get pinned into place shortly.
- The first round you weave on the base rather than the side,
With the left most weaver go under two stakes and over one and back to the front – working right.
Repeat this for the next weaver, under two over one, and back out to the front.
Continue this until you’ve completed one round of the whole basket. - Now place the basket upright
Continue the same weaving pattern but on the side of the basket. Outside two inside one.
- When you come to the end, add a new weaver butt to butt as before and continue till the tips.
Replace one rod at a time and weave this on before replacing the next rod, to keep the weave pattern.
- Now that you’re working on the walls make sure you are squashing the weave down firmly as you go.
If you don’t your basket will be very loose once’s it dried.
Pushing the weave down can be done quite well I found with the side of a gloved hand, tapping firmly between the stakes. A stout branch can be used for this too. - That’s the upset complete. We now change weave,
repeating the same weave as on the base, in out, in out, also known as a randing weave, start working up the basket. Again going from tip to tip and tail to tail keeps a nice flow though the basket.
- Once you’ve worked the first inch or so of your basket you may find that the stakes self support.
If they do you can untie the tops, if not, keep them tied but just be aware of the basket curling in at the top as it grows.
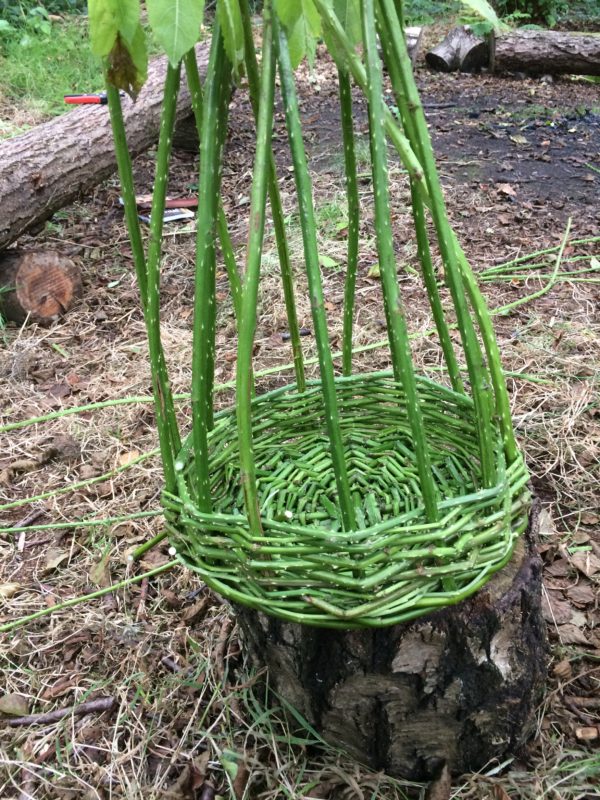
- Build your basket till your desired height
Ensuring you’ve still got a good strength at the top of the stakes.
- Continue to Part Three
Creating the border, and finishing the basket
.
-
 Basket Weaving Course£110.00
 -
 Progressive Basket WeavingPrice range: £80.00 through £425.00
2 thoughts on “Bramble Basket Weaving – Part Two”
Comments are closed.